


2013
May
24
HTML and CSS for E-book Self-Publishers, Part 4: EPUB Format and Sigil
Now that we have covered the basics of HTML and at least the language of "CSS" style sheets, we need to start putting that information together. This installment covers two pieces of the puzzle: the format of EPUB files and the workings of the Sigil EPUB editor. Sure, they are different topics, but since I use one to describe the other, and to some extent the other to describe the one, it makes sense to introduce them together.
The EPUB file format
There are any number of file formats I could have chosen to describe, but EPUB has a lot going for it. Specifically:
- It is an open standard. Anyone can freely find out how the format is made up and how to use it. A great many of the other formats are proprietary. That doesn't mean you can't find out what's inside, but you might have to pay for the information, you might have to rely on someone who has reverse-engineered it and may or may not have gotten it right, or you might, in the end, not be able to get it at all.
- Largely as a consequence of being an open standard, EPUB is the most widely used and most likely to find support across platforms. Yes, I know that Kindles to not support it, but that is likely to change.
- There is a free and effective EPUB editor, i.e., the often-mentioned Sigil, which we'll talk about below.
What's inside
As I mentioned in Part 1, an EPUB file is really a ZIP file, and I can't imagine anyone reading this who doesn't know what a ZIP file is. It differs from a generic ZIP file in that it has a different extension, and exactly what goes into it is precisely defined. When I created my examples, I did so in a document called, "Example 1." (Very creative in naming, aren't I?) The structure of the EPUB file is shown below, conveniently screen-captured from Sigil.

The first thing you should notice is that it looks like a directory structure, which is exactly what it is. A directory structure inside a renamed ZIP file. I have expanded the three folders that I actually have something in.
- Text
This contains the actual content of your document: chapters, title pages, etc. You can name them whatever you want.
- Styles
This folder contains your style sheets. Probably most of the time, you will have just one, but I've made a separate one for each page just to keep things simpler, especially when I get to showing how I did the examples.
- Images
Even if your book has no actual pictures, you might still want images for graphical effects. Now, I let something less than ideal slip through here and didn't fix it because it serves as a useful illustration. Two of the files are in PNG format. This is the format I use by default for most purposes, and I missed converting those two before I put them in. It turns out that PNG files are just fine in an EPUB document, but others such as Amazon's AZW format (based on MOBI) accepts only GIF and JPEG. If you don't have a converter that will convert images for you as well, you could find yourself in trouble. Stick with GIF and JPEG.
You will notice other folders that look interesting, but using them goes beyond anything that we can remotely categorize as part of an introduction. We'll leave them alone for now. But notice, too, that there are a pair of lone files at the bottom. I'll show you what these are, and then you can promptly forget about them.
- content.opf (opf stands for Open Packaging Format.) This essential file tells the e-reader what is in the document and what to do with it. Here is the one from my examples project:

Inside this file we find three important sections. Metadata records all those administrative details like title, author, and publisher. Manifest tells your e-reader what files it needs to properly render the book. They'd better be there. Spine tells the e-reader about the reading order of the different sections. This is necessary because you name them anything and there is no other way to tell.
- The other file is toc.ncx. toc means, obviously, Table Of Contents, and ncx means, less obviously, Navigation Control file for XML. Again, here is the one from my example:
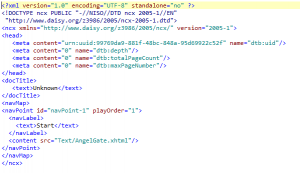
The head and docTitle sections contain more information about the document, but the important part is the navMap section, which lists everything in the table of contents and where to go when the reader clicks on them.


And that's all I really need to say about those two files. I'm sure you noticed that they conform to the rules for XML documents, and you might find in them some scary things like XML namespaces, which I purposely left out when I talked about XML. But as you recall from the beginning of this installment, I told you that you could find out about these files and then promptly forget about them. That is because Sigil takes care of them automatically, and you'll probably never have to edit one yourself. I can't think of a reason why you would, but it's helpful to know what they are for. If you are a masochist, you can look here.
A note about DOCTYPE
If you will remember way back in Part 2, I promised to say a few words about the !DOCTYPE tag. I bring it up here, because this is where !DOCTYPE becomes important. You'll notice that toc.ncx has one, but content.opf doesn't. Proper XHTML files, including the ones created by Sigil, also have them. The tag from toc.ncx is this:
<!DOCTYPE ncx PUBLIC "-//NISO//DTD ncx 2005-1//EN" "http://www.daisy.org/z3986/2005/ncx-2005-1.dtd">
The most important part is the URL, which points to a DTD or Document Type Definition. If you were to pursue that link, you would find a file that contains such human-unreadable things as:
<!ELEMENT navPoint (navLabel+, content, navPoint*)>
<!ATTLIST navPoint id ID #REQUIRED
class CDATA #IMPLIED
playOrder CDATA #REQUIRED
>
That's OK. Humans aren't intended to read these files and as an e-book publisher, you will never be called upon to write them. DTDs define the content and structure of document files so that software can validate them. I'll talk a little more about validation when we get into Sigil, but for now keep in mind that it is important that your documents be correct.
Getting around inside an EPUB document.
Since this is really a ZIP file with an internal directory structure, you get around inside it just as you would with any directory structure. Nothing abstruse. Let's look at a couple of examples again, the reference to a style sheet, and the reference to an image from inside a style sheet:
<link href="../Styles/AngelGate.css" rel="stylesheet" type="text/css" />
background-image: url(../Images/drop-cap-b.jpg);
In both cases, you start from where the file using it resides, go up one directory (..), then into the directory that contains the file you need, then the name of the file. If you have been using Windows, or Linux, or OS-X, you already know how to do this.
Sigil
Yes, I could have said more about the EPUB format, but you shouldn't need to know much more for a while. If you have a background in programming, or if you have read over these installments a couple of times, you should be able to add content files to your document, link them to style sheets, link style sheets to background images, and put images directly into your document. You might not be able to get the images exactly where you want them yet. There will be more about that next time.
Now, if you are a hard-core geek, you can set up a folder on your computer, build the directory structure and write all the files by hand, zip it up, and rename it to an EPUB file. If you do everything right, it should work. You don't really need anything more than a text editor and a file compressor. But doing everything right is the tricky part. There are a hundred places to make mistakes that will break your book, and finding them on your own will be more than a nuisance. Furthermore, doing it by hand takes a lot longer even if you don't make mistakes.
That is where an EPUB editor comes in handy. For the purpose of this series, as you should know by now, I have chosen Sigil. Besides the fact it's the one I use and therefore am most familiar with, it is 100% free, does a great job, and is widely supported. Anything I don't tell you about it you can easily find out by yourself somewhere else on the Internet.
You can get Sigil here.
When you go to that page, you will see a screen shot of the Mac version. What you will see in my post are screen shots of the Windows version on Windows 7 Professional. You will also see a cool chapter header format trick on the web site from Alice's Adventures in Wonderland, which, incidentally, I read recently. That example might be a bit deceptive on their part because although, yes, you can do that effect in Sigil, Sigil won't do any of it for you. You have to code it by hand, which requires understanding how all the pieces of XHTML and CSS fit together. Although it's not my example, I'll try to remember to show to do it in Part 5.
When you open Sigil, you'll get something like this:

It starts out with a default, essentially empty, document. You could save this and view it in an EPUB reader, but there is really nothing to view. I normally start out with a document that was exported through some degree of subterfuge from my word processor.
The left end of the top toolbar and the whole second-row tool bar contain buttons much like any editor or word processor. So is the find box under the editing window in the middle. I won't talk much about these, because there are tool tips, and if you are wanting to do your own e-book formatting, then you are probably a writer and already know about all those buttons. I will discuss the save button, however, because there is something about it you should know.
The functions
Save
![]()
Yeah, it saves, but there is more to it than that. Sigil will not let you save a document if there is an XML error, which will almost always be in one of the content files. In such a case, Sigil will give you the option of fixing it manually, or letting Sigil do it automatically. Sigil usually gets it right, but I've had cases where it got it wrong and I still had to fix it manually.
Book View and Code View
![]()
This pair of buttons is enabled only when viewing a content XHTML file. Being the geek that I am, I more often than not edit in Code View (right), which shows all the nasty XHTML I talked about it Part 2. But then right away, I switch over to Book View (left), which renders the section as an e-reader would. Can you imagine having to save your file and opening it again in a separate e-reader to verify each change? I don't know what rendering engine Sigil uses, but its rendering matches other EPUB readers I've tried, and when converted to MOBI and uploaded to my Kindle, though not identical, it's really close. The internal renderer is quite reliable for checking document appearance.
Here also, Sigil will validate the XHTML before switching to Book View and let you decide how to fix it if there is an error.
Split at Cursor
![]()
This button takes a single XHTML file and splits it in two at the point where your cursor is. It doesn't just split the file; it also replicates the header information so that both files are syntactically correct. It might not sound too useful, but I use it fairly often, especially when formatting the front matter, though I do it with <ctrl>-Enter (on Windows), which does the same thing.
Insert File
![]()
An easy way to put in a media file. Sigil is smart enough to know where you can put one and where you can't, and if you try this where you can't, it'll let you know. This function pops up a dialogue box, and I'll show you what it looks like:

This is from my example project, and shows all the media files (in this case images) that are already in the document. The preview is truly helpful. The files shown in the list are the ones already in the document, but if you need to insert a file that isn't already inserted (common), click on the "Choose File..." button, and select it from your computer. Sigil will import the file and insert it at the cursor point.
Insert Special Character
![]()
Remember in Part 2 where I said there were special characters defined in XML? The ones that start with an ampersand and end with a semicolon? This button lets you choose the one you want and plug it in.
Note: I'm skipping the next three buttons. They're a little more advanced.
Donate
![]()
Not a bad idea. I'd like to see further development on Sigil.
Metadata Editor
![]()
Remember how, several paragraphs up, I said that you could forget about those two special files because Sigil takes care of them? This is one of those places. The metadata editor sets the corresponding information in the config.opf file. Certain metadata such as author and title are required and those are in the dialog by default. Others you might want can be added as needed. The lists include everything from librettist to woodcutter, so it's unlikely you won't find what you need. If you want something really weird, like "alien liaison", I suppose you could edit the config.opf file yourself and put it in, but there isn't an e-reader out there that would know what to do with it.
Generate Table of Contents
![]()
Back in Part 2, I told you to to use header tags (h1 through h6), and this is where it comes into play. Click on the button and you get a dialogue box like this:
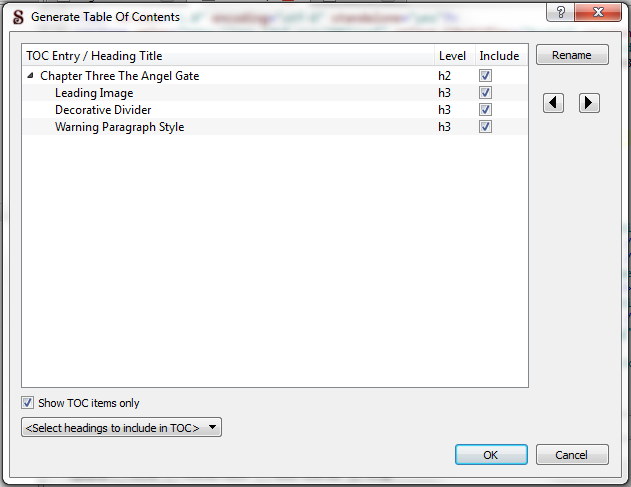
Again, this is from my example file, so there isn't much in it, but I'm showing it because I used both h2 and h3 headers. That let's me demonstrate how Sigil understands the document outline hierarchy. You can check which headers you want to put into the table of contents, and if the organization isn't just how you want it, you can move individual headings up and down in the hierarchy with the left and right arrow buttons. If I were to click "OK" here, it would generate a matching hierarchical table of contents and insert it into the document.
I use this function all the time.
Note: I'm skipping the spell-check button, because as writers, you already know what this is about.
Validate EPUB
![]()
Do not overlook this button! As I said before, Sigil won't let you save bad XML, but there is more to a valid EPUB document than just valid XML. The links have to point places. Some metadata is required. And so forth. The validation will check everything for you and report any errors in the window at the bottom. Fix them before you do anything else.
Have you used KindleGen? It converts an EPUB document to MOBI for transfer to a Kindle. If the EPUB file it starts with has an error, it might just exit and not tell you why. Calibre, another way to make the conversion, will do it, but the product you get might be broken in various ways that don't give you any clue to what is actually wrong.
I have never had an EPUB document properly validated fail to convert to another format, but I've had seemingly minor errors blow things up. I repeat: do not overlook this button!
In short, it is entirely possible to prepare an e-book with Sigil and use any of the XHTML and CSS knowledge I've tried to communicate. But you might be doing more work than you need to, and there are are a lot of effective designs that you won't be able to implement without getting into the code.
This wraps up Part 4. In Part 5, I'll show you specifically how to do many of them, and hopefully, you'll be able to pick up enough to come up with your own.


Comments
There are no comments for this post.
You must be logged in to post a comment.