


2014
Jun
04
How I Make Covers and Promotional Images: the Software
OK. I fooled you. I can't actually tell you how I do it, because there is a long learning curve. However, my intent is good. This post is a follow-up to an earlier one on self-publishing skills. I'm hoping to leak this information out a bit at a time so as to not overload newcomers, and yet hopefully nudge someone in the direction of understanding how all this is done.
On the other hand, if you are an artist in the sense that you can pick up a brush and commit your vision to canvas (or do the equivalent with a good paint program) then all of this technical stuff might be moot. I'm only an artist in the sense that I can see the vision in my mind, but I need to rely on a little more than just my hand to bring it to reality. That's where the more complicated application of software comes in. I'm a half-artist.
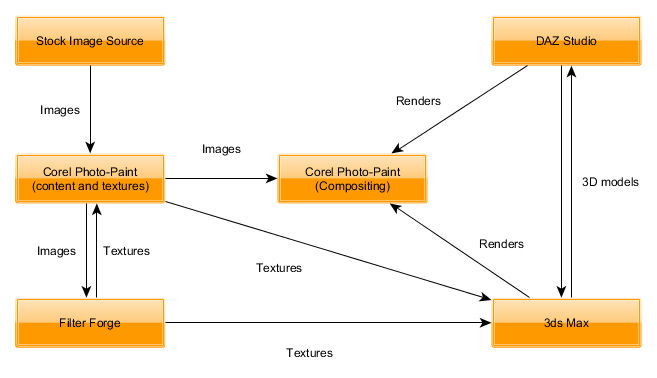
Let's start out with the general work-flow, which I've tried to diagram in this figure. It shows four pieces of software, and a fifth essential element: a legitimate source for raw images. Corel Photo-Paint is listed twice because it appears in two distinct roles, and to try to combine them leaves almost all arrows leading there with the result that you can't make any sense of it all.
Even this is simplified. For one thing, other flow paths are possible; I've included the primary ones that get most of the traffic. For another, there are special situations where I might use Photoshop, or Adobe Illustrator, or CorelDraw, or Blender, or Mudbox, the Windows Snipping Tool, or other programs. This graph, for example, came from yEd. However, for probably 99% of cases what you see here gets the job done.
Now, let's take a closer look at each of these parts so that I have an occasion to throw in some useful pointers and tips for anyone wanting to jump in with both feet.
Before Software: Stock Images
If you look at my images, you can probably tell which ones ultimately come from photographs and which were completely software generated. OK, if I spent more time with the 3D models, it would be harder to tell, but there is that point of diminishing returns. Images are all over the Internet, and if you do a Google image search, there is a good chance you'll find what you're looking for.
Warning: DON'T USE THEM!
You can't do it legally because someone somewhere owns the rights to them, and just because Google's indexer finds them and catalogs them does not mean that they lapse into public domain. You'll likely find any one image, if it's good enough, on a dozen different web sites, and that means that someone else has probably used them without permission. That doesn't mean you should. At the very least, you may not own the rights to what you created from it. Think about that, and then think about what would happen if the copyright owner sued. You're a content creator right? You expect your copyright to be honored, right? So honor other people's.
My personal choice for stock images is canstockphoto.com. I like them because of their sales model. Buying single images seems costly, and monthly or annual subscriptions are costly unless you download a lot of images. If you don't know ahead of time how many you'll need, or when, canstockphoto's system is ideal. You buy credits, and spend them as you need to. They never expire.
Free alternative: photographer or artist friend, or stealing. Note that some images, such as those produced by NASA, may go automatically into public domain and be available for use.. Check first.
Image Processing Software: Corel Photo-Paint
Yes, you can use Adobe Photoshop if you want, but I think Photo-Paint is easier to work with. Everyone knows about Photoshop, but if you hang around the world of professional graphics art, you'll find a lot of the people there prefer Corel products, so I 'm not alone. That, and Adobe has started with this stupid "rental" system designed to make them more money and you can't actually buy Photoshop anymore. I was hooked on Photo-Paint in the early '90s when I picked it up at a now-defunct retail computer store for $100. That was quite a chunk of cash in those days, but it turned out to be one of the very few software purchases where I felt I got a bargain.
As the diagram above indicates, image processing software (more technically, raster or bitmap editing software) serves two distinct purposes:
- Preparation of component images and textures.
- Compositing, or putting the final image together.
Definition: Texture. A catch-all term referring to any of, or a collection of related, texture map images used in the construction of materials for 3D modelling. There is more about this below.
Essential skills:
There are, naturally, a lot of skills to be learned, but there are two in particular that seem to be missed by beginners, so allow me to point them out to you so that you are not one of them.
Working with masks
Masks are a way to mark off certain areas so that manipulations only apply to them, and a way to mark certain areas for trimming. Let's take a look at how some of these methodologies work. I was thinking of a blog post to show how I gave Mellia those big eyes, but what the heck? I'll spill the beans here.
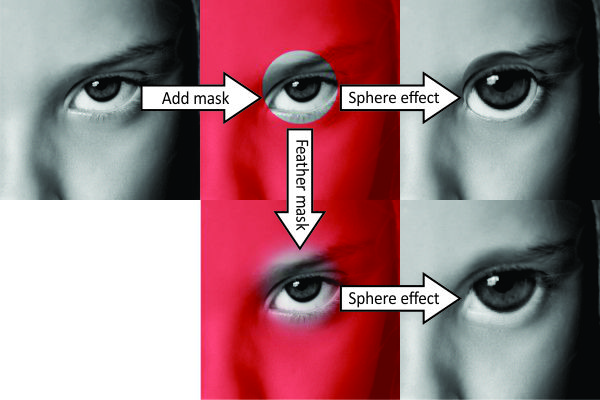
There are lots of ways to create masks. You can draw them as shapes, paint them, create them by color, and so on. In the big-eye example, I simply draw a circle of about the right size. Also in this case, I made a deliberate mistake just to show you the difference. In the upper right result, there is an ugly edge around her eye that makes her look like she's wearing a monocle. That is because the mask I used has a sharp boundary, and so the sphere effect gets chopped off at exactly that edge. In the improved result at the bottom, I feathered the outline of the mask so that the effect tapers off gradually.
That sphere effect is only one of dozens that are built into the program. There are color adjustments, lens and creative effects, and more. But for the real power user, see Filter Forge below.
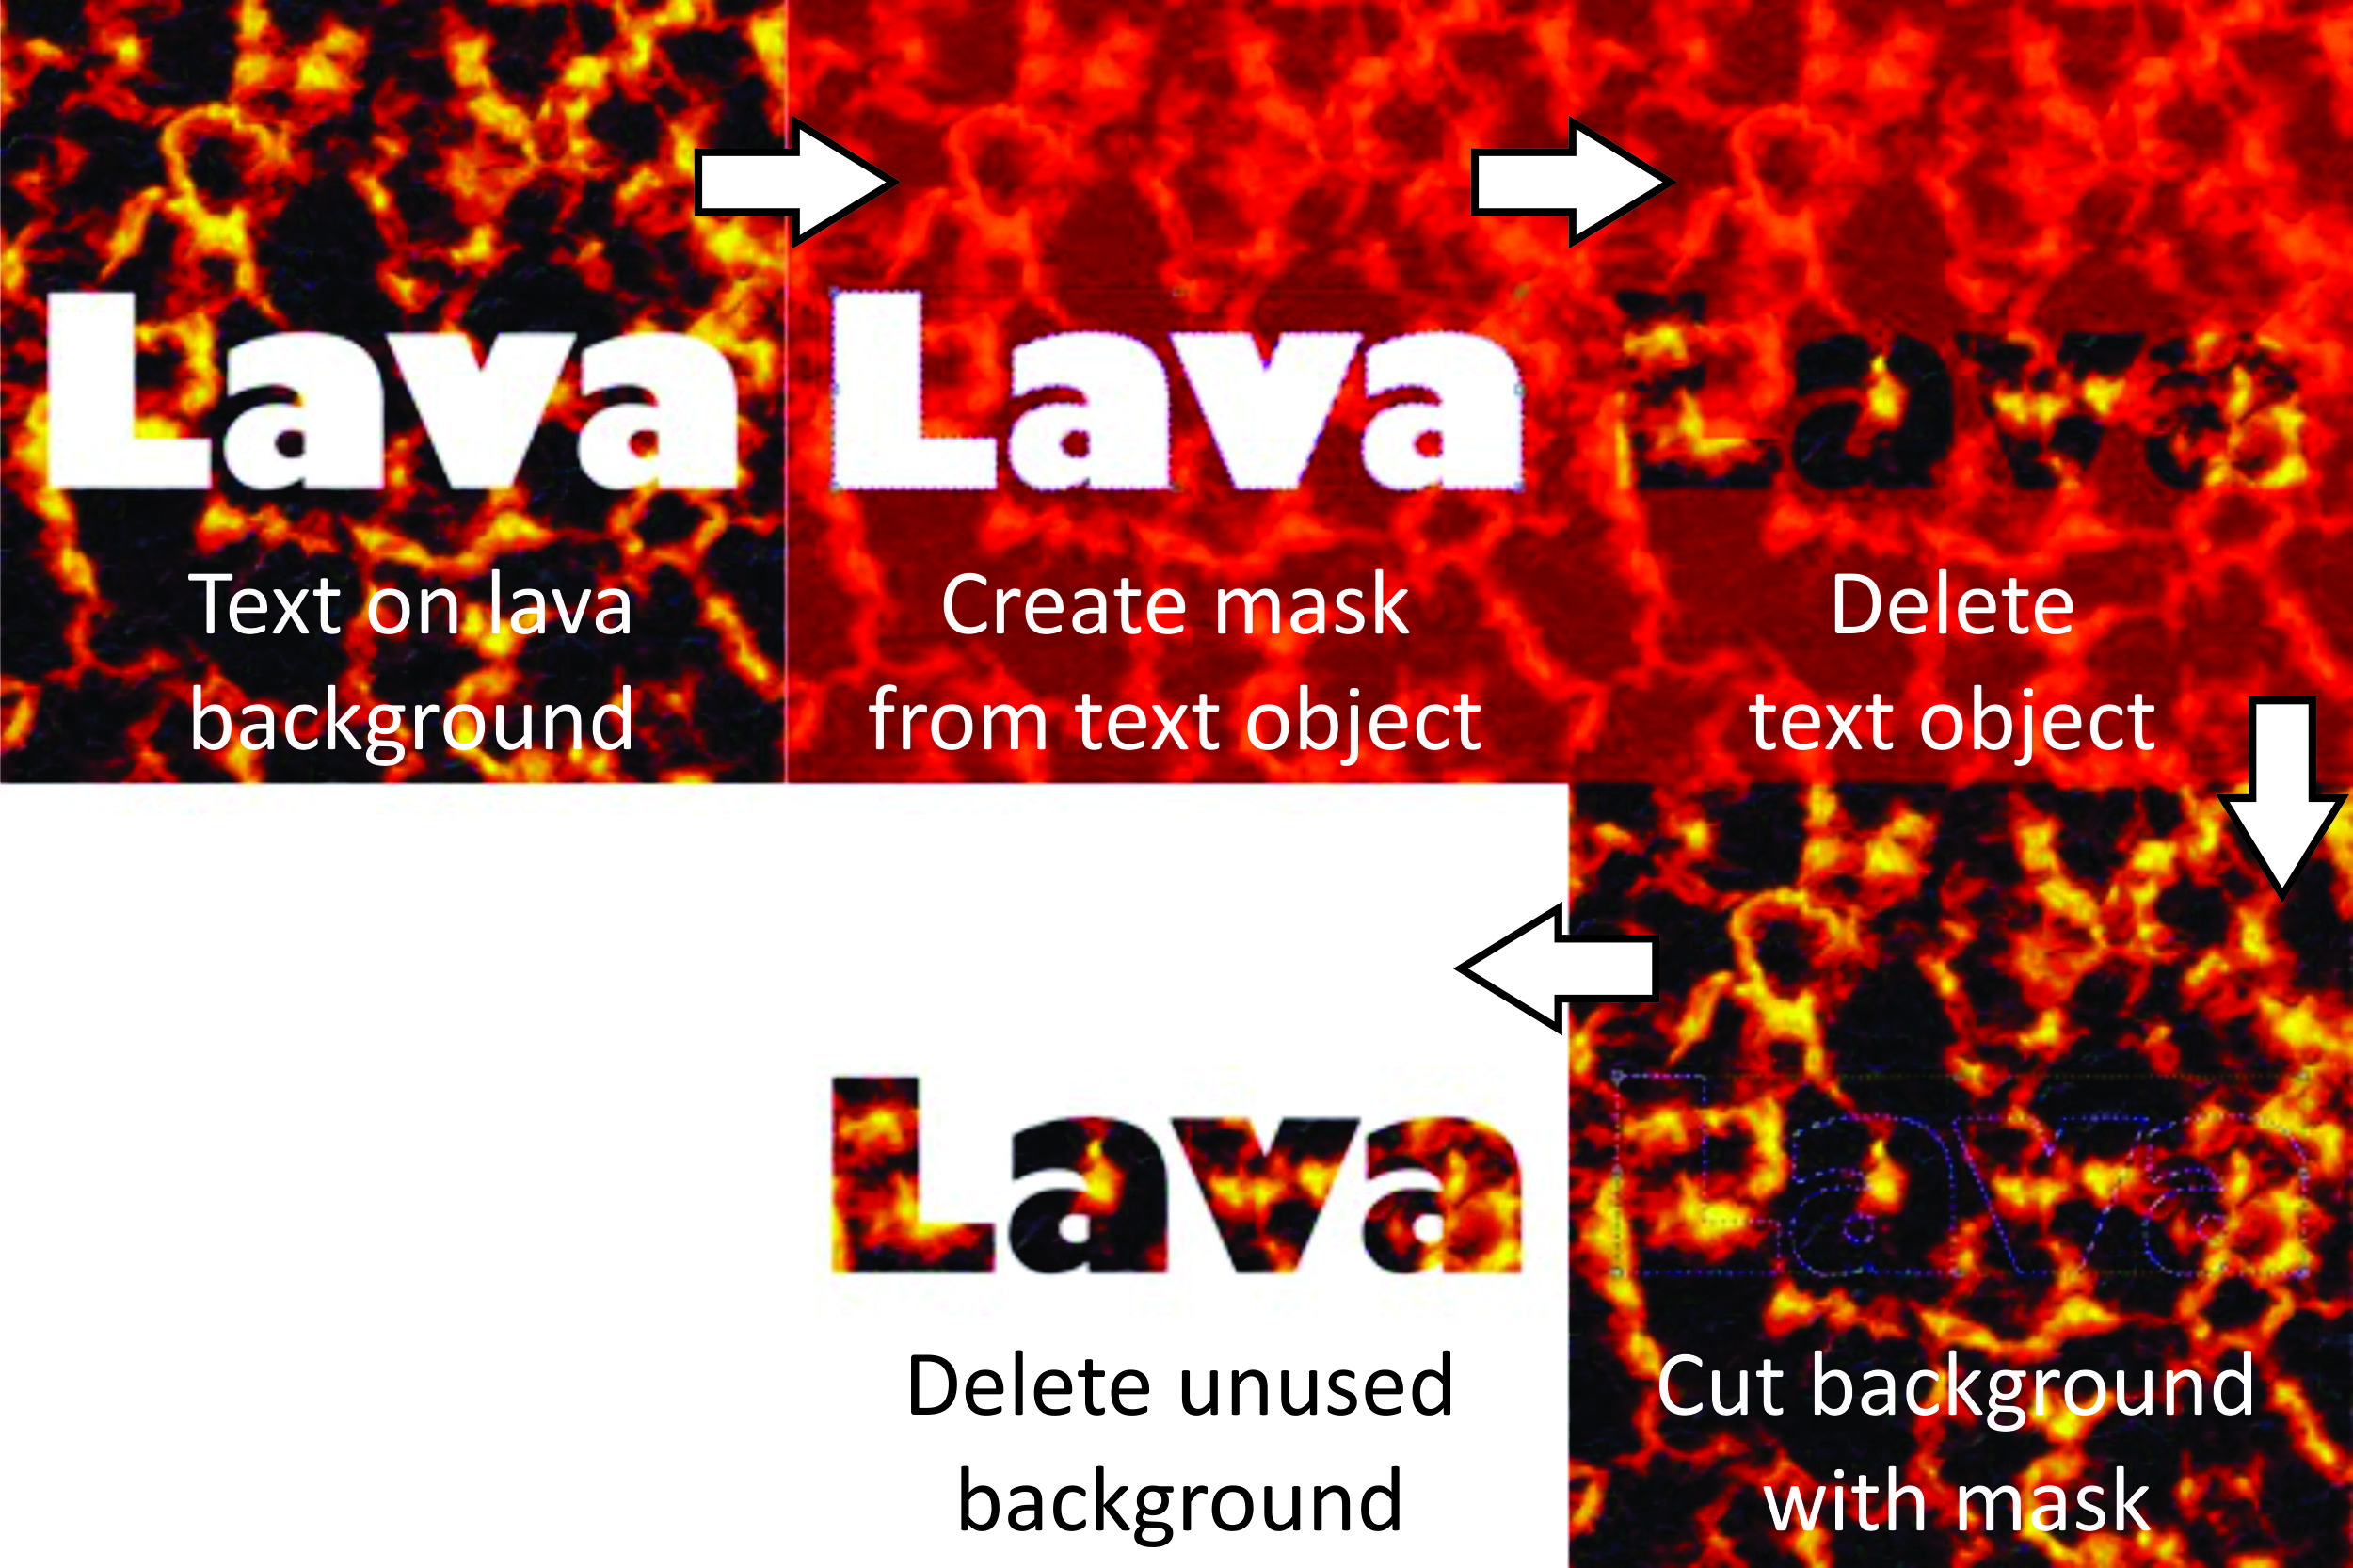
The next example shows the use of masks as a cutter, in this case, to create the word "Lava" with lava. There are other ways to accomplish this, but the first one I figured out is a lot more time-consuming and not nearly as elegant. Point: that is because I hadn't really learned how to use masks to their best advantage, so make sure that is a point that you don't miss.
Working in layers
I say "layers," though that is really the Photoshop term. Photo-Paint uses "objects," which are almost but not quite the same thing. The strategy in using them is somewhat different, but they give the same results. The important part is that you work with final images not as one big glob but in discrete pieces that you can "layer" on top of each other.
Below is a recent promotional image I made for The Lastchild.

Aside from being one of my favorites, it looks like a single image, and when it gets exported at the end, it is. But in working with it, it is in eight discrete layers as shown below. The checkerboard regions represent those that are transparent in the individual layers. You have to have that because without transparency it makes no sense to have layers at all. Among other advantages, layers allow you to move components around until you get the arrangement you like.
Lad's staff was rendered in 3ds Max, where I first made the model.
Definition: Render. To convert a 3D model in software to an image, factoring in all the textures, lighting, and camera and special effects.
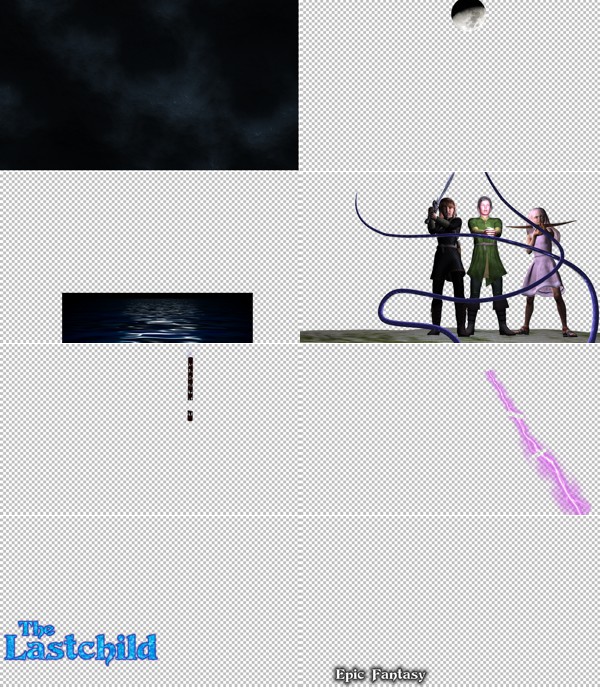
Andrael, Lad, Kekinnah, and the tentacles were all rendered in DAZ Studio (getting from DAZ to 3ds Max is possible, but it's a bitch!), but the tentacles were modeled in Max and exported to DAZ. The moon and the ripples are licensed images from canstockphoto. The text elements came from an earlier pass of Photo-Paint. The hazy night sky, the lightning, and the texture fill for the title were generated by Filter Forge. All of this is to make a point: several tools and sometimes several passes of the tools are often necessary to get the effect you want.
If you look closely, you'll see that sections of the staff and the lightning are cut out. This is because both of them have to appear to be in front of some parts of the characters layer and behind others. You should be able to guess how I did this. I used portions of the character layer to create masks that then cut out sections of the staff and lightning so that they line up perfectly.
As I mentioned in the prior post, there is a free alternative: GIMP. I find GIMP less easy to use and less powerful than Photo-Paint, but the difference between $500 and $0 can be a deal-breaker for many.
3D-Modelling Software: 3ds Max
This could be the biggie. If you're writing romance, then there is a good chance that you can find the images you want from a stock photo service, as images of men, women, and men and women together, clothed and less so, are all over the place for the licensing. But I need exotic space ships and elfin artifacts, and mysterious ancient ruins. Sure, you can find images of these, but imagination is of such a nature that it is unlikely that the imagination that went into the spaceships you'll find at canstockphoto matches yours. So you have to make your own
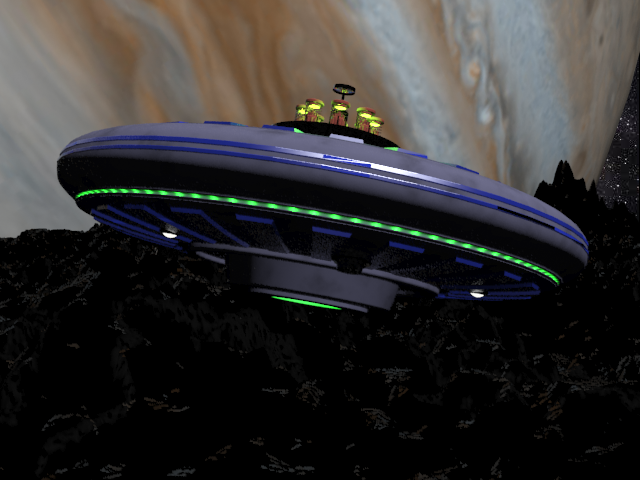
Again, if you are an artist, just draw it. If you're a half-artist, conceive it and build it in a 3D modelling program. Such was the case with this wormface ship. (If you don't know what a wormface is, shame on you! Be sure to look here.) The starfield in the background was made with Stellarium. Yes, Celestia and Stellarium are two more of those programs that come in handy but I don't use that often. The saucer, Jupiter, and the surface of Jupiter's moon Ganymede were all completely modeled and rendered in 3ds Max
When I first started developing an interest in 3D modelling, I tried the big three programs at the time: 3ds Max (when it was still owned by Discrete), Maya (when it was still owned by Alias) and LightWave. 3ds Max and Maya have since been bought up by Autodesk, but LightWave still belongs to NewTek. The whole 3D modelling scenario is complicated enough that there is no obvious single way to go about it, so all the manufacturers had totally different approaches, and the methodology employed by Discrete just seemed the most intuitive to me. I've noticed that a lot of movies, such as the ground-breaking Final Fantasy — The Spirits Within, have been done with Maya. And commercials — shhhh! Pixar doesn't use any of them; they made their own software (Marionette) for some reason.
Anyway, it took a long time to get where I am now with 3ds Max, but there is still a long way to go. The learning curve is steep, but it's a lot of fun.
Essential skills:
Mesh editing
A mesh is what makes up a model. There are other methods: polys, NURBS (non-uniform rational basis spline) surfaces. The math behind these is horrendous, but you don't need to know it. Each method has its advantages and disadvantages, but when push comes to shove, it's the mesh that's the basis for everything.
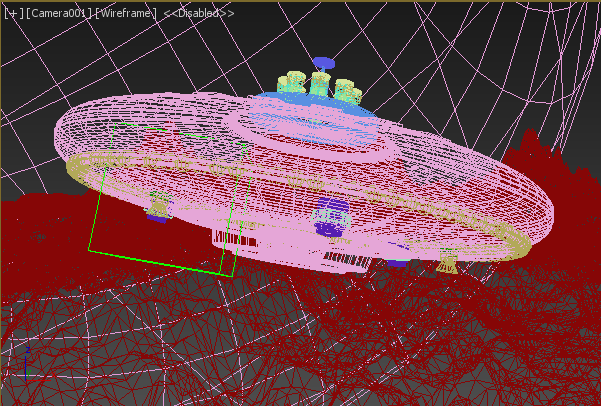
Here are the meshes that go into the Ganymede scene. What you see are a blue-bazillion points connected with a blue-bazillion lines. Fortunately, it's pretty rare when you have to add those points (vertices) and lines (edges) by hand. There are a wide variety of tools to do all that for you. To make the spaceship hull, I drew a curve representing its profile, then rotated that into a 3-dimensional object with the lathe modifier.
There are a lot of basic shapes, like spheres, cylinders, and planes, and some fancier ones that 3ds Max calls things like spindles and oil tanks. But you should view them only as starting points, and only rarely the end of the matter. If you want to get started in 3D, take the time to make sure you really understand meshes. Doing so will save you lots more time in the future.
Materials
These are the second big topic you need to understand. Look closely at the saucer and you'll see that there are even dirt smudges on the hull. Those little details make all the difference in realism. But to talk more about materials let me introduce an image from a model I just started.

This is one of Uzzrikl's towers. There are more of them, or will be. I want you to look closely at the stones that make up the walls. See the roughness, the beveling between the individual blocks, and the sections of the wall that look like they're shifted inward? Well, here's the secret. None of those are really there; the underlying model is just a simple smooth cylinder. The illusion of physical texture is a rendering effect that is specified by a special type of texture image called a bump map. There is a similar feature called a displacement map that actually generates physical geometry, but you try to avoid using those.
The colors are specified by what is called a diffuse map. There are maps for glossiness, opacity, ambient occlusion (never mind what that is for now), reflectivity, and more. Plus, you can stack maps on top of each other depending on the effect you need. For example, I could add a paint layer on top of the stone that says, "Uzzrikl's Tower," but I won't.
Of course the software needs to know how to apply the map to the actual surface, and that gets you into a whole new can of worms called UVW mapping. That is a technique to specify what points in the image line up with what points on the model. If you import a model from DAZ Studio to 3ds Max, you'll get a single composite material for the entire person, feet, fingernails, eyelashes, along with a complicated formula so that everything goes in the right place. You can't do UVW mapping by hand — at least in a human lifetime — but there are tools in the software that help you with it. It's way beyond the scope of this post to try to explain it, but you need to know that it's there. In many cases you can apply a texture without a UVW map and it works as you would expect, but there are other cases where you can't.
Again, as I mentioned in the other post, the free alternative is Blender. I can't tell you much about it because I only use it for one thing. There is a problem transferring models from DAZ studio to 3ds Max. I find that sometimes, if I import it first into Blender then export it back out, it comes across correctly. This is really a case of software manufacturer's not believing in testing their products for compatibility with other software. They're all guilty. I gripe about this again below.
Texture-making Software: Filter Forge
Filter Forge is almost unique in the graphics world; I don't know of anything else quite like it. If you are so inclined, you can separate its purposes into three broad groups:
- Image processing and special effects
- Pattern generation
- Creating textures
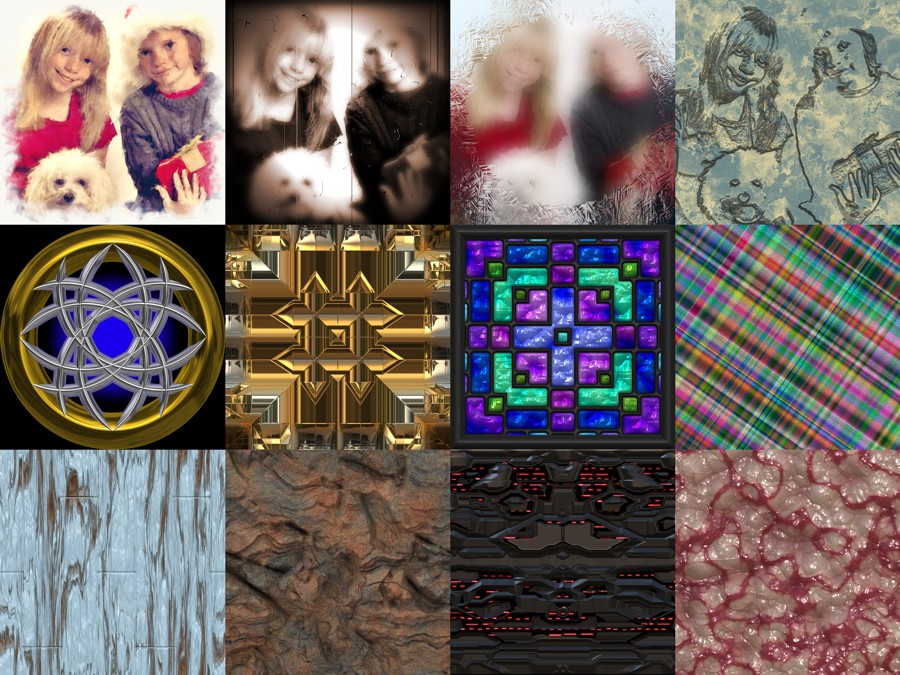
I say, "if you are so inclined," because in the real world the three tend to merge together. One way to look at the difference between patterns and textures is that textures generate diffuse, bump, normal, and sometimes other maps to use in building 3D materials and plain patterns don't. Some patterns do. So do some image effects. For example, the Carved in Stone effect at the upper right generates, among others, the following diffuse and bump maps.

The composite image shown in the collage is actually a 3D rendering of the maps applied to a surface. If I wanted, I could take that bump map and apply it to any other element in a scene: a marble obelisk, a totem pole, a steel plate, you name it, and from that original photograph, I suddenly have the kids cast in bronze. This is an example of the various and sometimes unexpected ways that the different components of my work flow interconnect. (Incidentally, that image of the kids is properly licensed.)
Filter Forge can do so much because of a brilliant design. Anyone can write "filters" and contribute them, so that as of now there are 10,224 of them to choose from. Of course, you can't always find the one you want (I want one for circular roof tiling; I might have to write it), but usually you can come close enough. They market Filter Forge as a Photoshop plugin, but I've never used it with Photoshop.
There is no good free alternative to Filter Forge. Most of the effects you can do with lots of blood, sweat and tears using a graphics editing package, in days instead of minutes. And time makes a difference. Any professional has to have Filter Forge. Unfortunately, in order to get bump and normal maps, which I consider essential, you have to buy the full "professional" version. That also gets you the ability to create and edit filters, which a lot of people don't need. A lot of people end up paying an extra $150 just for the diffuse and bump maps; I think they really need something in between.
People Maker: DAZ Studio
Although you can animate people in 3ds Max, there is no good way to make them. Therefore, DAZ Studio, which does exactly that, and does it well. DAZ Studio is free; they make their money selling content packages. How it works is this: you pick a model, adjust cheekbone height and pectoral size, etc., set expressions and poses, add hair and style it, put on some clothing, and there you have it. The problem is, these poses, shape morphs, hair styles, and clothing all cost money, but eventually you build up enough pieces to be able to get together the character you want.
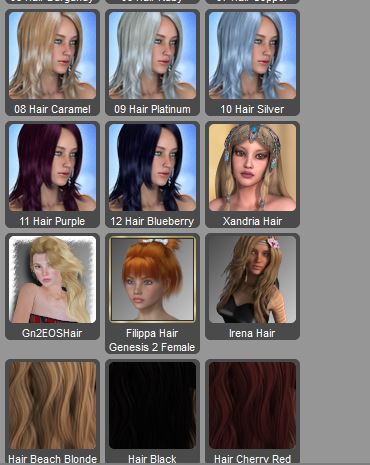
Here we see some choices in hair. If you browse their site, you'll probably find the hair style you want in the colors you want. (You can change hair color by manually editing its diffuse maps. See above.) But almost as soon as you find what you want, you run into one of the big problems with DAZ studio. Oh, the hair you want only works for the Aiko 4 figure, and you don't want to use, or don't want to buy, Aiko 4. The same problem exists with clothing, props, expressions, poses, you name it. I had Expressions for Genesis, then when everything changed to the new Genesis 2 figure, I had to get Expressions for Genesis 2. I have the Growing Up package, but it's only for females; if I want the same thing for males, I'll have to buy another package. I have one set of clothing for Genesis, and the exact same one for Genesis 2. Oh, did I mention there is Gia 6, Michael 3, Teen Justin and Julie, Kids 4, Victoria 5, The Girl 6, Josie, The Freak, Giselle 6, David 5, Millenium Kids.... The list goes on and on, but by now you should get my point. It can be quite a rat's nest trying to figure out what works with what. Somewhere along the line in their product specification, they sort of left out standardization. I wish they'd find find where they lost it. But even with this mess, you have saved days over trying to model a character in 3ds Max, and you've done it without being a ninja at mesh editing and without the half jar of aspirin you would otherwise need to take before it's all over.
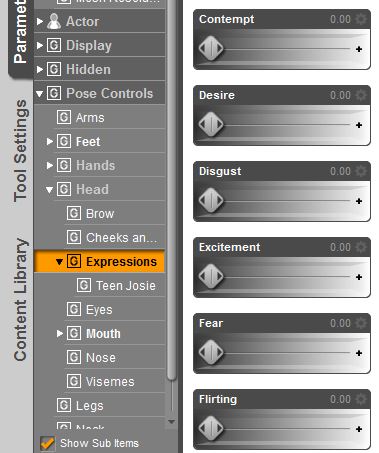
Once you find all the pieces you want that actually work together, doing things becomes a breeze. This figure shows some of the controls for Genesis 2 expressions. You want your character to be afraid, just crank up the dial. You can get sets of poses for elfin warriors, archers, superhereos, street punks, hand positions. And starting with a pose, you can adjust it any way you want.
The built-in renderer is actually quite good, and as I said above, I rendered the image of Andrael, Lad, and Kekinnah in DAZ Studio. But it doesn't compare within 1000 light-years of the sort of control that you get from 3ds Max. Compared to Max, the rendering engine, the lighting system, the cameras, the environmental effects all suck. DAZ is posed as a rendering system, but maybe they should think about re-inventing it primarily as a character creation system.
But this leads to another problem. Transferring models from DAZ to 3ds Max is about the same as turning your goldfish into a table lamp. We almost need Hermione's transfiguration skills! Sure, DAZ exports in FBX and OBJ formats, and 3ds Max imports FBX and OBJ formats, but if it ever works right without a lot of tinkering, it's time to run out for a beer to celebrate.
So, often I have to make the trade-off whether to render in DAZ Studio with less control, or export unposed, expressionless people to 3ds Max, implement its cloth system, and pose them all manually. It's doable, but a lot more work. Somebody, please get this figured out!
If you don't like DAZ, there is Poser. It's close to the same thing, except Poser costs money and you still have to buy figures, clothing, and props. Also, I think the Poser user interface sucks. There is an interesting phenomenon with software designed for artists. The manufacturers think they have to make the interface artsy, and making it artsy almost always makes it harder to interpret. ZBrush might be the worst. I couldn't figure out how to do anything, and I even had to Google how to find the help in the application. It is truly horrible!

But ZBrush brings up something else. If you're artistic enough, there is another way to make character models: sculpting programs, of which ZBrush is one. These allow you to start with a mesh of some blob shape and sculpt it by pushing, pulling, and texturing as you would a physical lump of clay. They allow you to paint directly on the surface, relieving you of worry about texture maps and all because it's all hidden safely under the hood. But they also require a level of artistic ability that pushes my limits.
These gargoyles started out as human-shaped meshes, and I mutated them into gargoyles and painted green gargoyle skin on them with with Mudbox . They went from there to 3ds Max for rendering with the final scene.
There are no truly free alternatives to DAZ Studio and Poser. Alas! There are a handful of free clothing and other accessories, which could, in theory, make it free, but rarely can you find just what you want.
In a nutshell, that's where my covers and advertising images come from. I hope I didn't scare anyone away from this, because that wasn't my intent.
Come on! Go for it!


Comments
There are no comments for this post.
You must be logged in to post a comment.